皆さんこんにちは。
前回に引き続き、チュートリアルの解説を行います。この記事では、初学者の方向けに最新の、NextJSを使用したチュートリアルとしてポートフォリオサイトの作成について解説しています。
今回は、本シリーズ最終回で Hobbysページ の作成を初学者の方向けにわかりやすく解説していきます。
本記事はシリーズとなっております。
もし、概要ページや前回のページをご覧になってない方は、ぜひ下記に示す解説記事を順番にご覧いただければ幸いです。
ポートフォリオ作成 全編
- ポートフォリオ作成 概要編(No.1)
- ポートフォリオ作成 Topページ編(No.2)
- ポートフォリオ作成 Aboutページ編(No.3)
- ポートフォリオ作成 Skillsページ編(No.4)
- ポートフォリオ作成 Worksページ編(No.5)
- ポートフォリオ作成 Hobbysページ編(No.6) <<< 今回の記事
ポートフォリオ作成 Hobbysページ解説
では解説を始めていきます。
前回までの解説を終えた時点で、現在のディレクトリはこの様になっています。
$ tree ./pages/components

pages/components
├── modules
│   ├── skillCard.tsx
│   └── workCard.tsx
└── organisms
    ├── about.tsx
    ├── footer.tsx
    ├── header.tsx
    ├── skills.tsx
    ├── top.tsx
    └── works.tsx


// 略ここで、./app/pages/components/organisms/ ディレクトリ内に新たに hobbys.tsx ファイルを作成してください。
そして、作成したファイルを下記のように編集してください。
import React from "react";
import Header from './header';
import Footer from './footer';
import HobbysLeftCard from "../modules/hobbysLeftCard";
import HobbysRightCard from "../modules/hobbysRightCard";
import { hobbysCardContents } from "../../api/variable";
import { hobbysTypes } from "../../api/type";


const Hobbys:React.VFC = () => {

    return (
        <>
            <Header />
            <div className="flex justify-center">
                <div className="flex-none w-0 md:w-1/12 sm:m-1 md:m-4">
                    <></>
                </div>
                <div className="flex-1 flex-col w-full md:w-5/6 m-1 p-1 sm:m-1 md:m-3 flex justify-center">
                    {hobbysCardContents.map((contents:hobbysTypes)=>{
                        return(
                            contents.id % 2 === 0 ? (
                                <HobbysLeftCard contents={contents} key={contents.id}/>
                            ):(
                                <HobbysRightCard contents={contents} key={contents.id}/>
                            )
                        )
                    })}
                </div>
                <div className="flex-none w-0 md:w-1/12 sm:m-1 md:m-4">
                    <></>
                </div>
            </div>
            <Footer />
        </>
    );
}

export default Hobbys;
Hobbysページの本体のコードは上記になります。
こちらも、カードUIを複数表示させるデザインとしましたが、3項演算子を使用し、偶数か奇数かで表示させるカードUIを分けています。
このように、条件でUIを変化させるということをやってみても面白いのかもしれません。
ポートフォリオ作成 HobbyCard解説
続いて、先程作成したHobbysページ本体に表示させるカードUIを作成していきます。
./app/pages/components/modules/ ディレクトリ内に hobbysLeftCard.tsx hobbysRightCard.tsx の2つのファイルを用意してください。
hobbysLeftCard.tsx ファイルは次のように編集してください。
import React from "react";
import {hobbysTypes,hobbysdescType} from "../../api/type";
const NoImage:any = require("../../../public/no_image_logo.png").default;

const HobbysLeftCard:React.VFC = ({contents}:{contents:hobbysTypes}) => {
    return (
        <div className="flex flex-col md:flex-row w-full h-94 bg-sky-300 mx-2 my-10 rounded-xl transform
                            hover:scale-110 transition-transform">
            <div className="md:w-7/12">
                <h2 className="mx-5 my-5 text-4xl font-medium">{contents.title}</h2>
                <div className="mx-5 my-7">
                    {contents.description.map((desc:hobbysdescType) => {
                        return (
                            <p className="text-2xl text-slate-600" key={desc.id}>{desc.param}</p>
                        )
                    })}
                </div>
            </div>
            <div className="md:w-5/12 flex justify-center items-center align-middle">
                {contents.image.src ? (
                    <div className="mx-3 my-3 xl:p-2">
                        <img src={contents.image.src} alt="img"/>
                    </div>
                ):(
                    <div className="mx-3 my-3 xl:p-2">
                        <img src={NoImage.src} alt="img"/>
                    </div>
                )}
            </div>
        </div>
    );
};

export default HobbysLeftCard;続いて、hobbysRightCard.tsx ファイルは次のように編集してください。
import React from "react";
import {hobbysTypes,hobbysdescType} from "../../api/type";
const NoImage = require("../../../public/no_image_logo.png").default;

const HobbysRightCard:React.VFC = ({contents}:{contents:hobbysTypes}) =>{
    return (
        <div className="flex flex-col-reverse md:flex-row w-full h-94 bg-cyan-300 mx-2 my-10 rounded-xl transform
                            hover:scale-110 transition-transform">
            <div className="md:w-5/12 flex justify-center items-center align-middle">

                {contents.image.src ? (
                    <div className="mx-3 my-3 p-2">
                        <img src={contents.image.src} alt={`img${contents.title}`}/>
                    </div>
                ):(
                    <div className="mx-3 my-3 xl:p-2">
                        <img src={NoImage.src} alt="img"/>
                    </div>
                )}
            </div>
            <div className="md:w-7/12">
                <h2 className="mx-5 my-5 text-4xl font-medium">{contents.title}</h2>
                <div className="mx-5 my-7">
                    {contents.description.map((desc:hobbysdescType) => {
                        return(
                            <p className="text-2xl text-slate-600" key={desc.id}>{desc.param}</p>
                        )
                    })}
                </div>
            </div>
        </div>
    );
}

export default HobbysRightCard;
これら2つのカードUIですが、左右で画像と文字の配置を変えております。また、レスポンシブ対応もしています。一定の画面の大きさになれば、カードUIの配置を上下に表示させられるようにしています。
ポートフォリオ作成 変数・型解説
次に、Hobbysページで使う変数と型について解説します。
./app/pages/api/ ディレクトリ内にある type.ts ファイルと variable.ts ファイルをそれぞれ次のように編集してください。
//ここから新しく追加した部分
export type hobbysdescType = {
    id:number,
    param:string
};

export type hobbysTypes = {
    id:number
    image: any
    title: string
    description:{
        id: number
        param:string
    }[]
};
//ここまで

export type worktechTypes = {
    id: number,
    mark: string
};

export type workTypes = {
    id: number,
    image: any,
    title: string,
    description: string,
    useTech:{
        id: number,
        mark: string,
    }[],
    repository:string
};


export type skillTypes = {
    id: number
    image: any
    title: string
    stars: number
    description: string
    color:string
};

export type skillCardCol = {
    red: string;
    blue: string;
    indigo: string;
    green: string;
}

export type topImage = {
    id: number;
    image: any;
}

export type urls = {
    urlBlog:string;
    urlGit:string;
    urlTwitter:string;
}
import {workTypes,skillTypes,importImage,hobbysTypes,hobbysdescType,worktechTypes,topImage,skillCardCol, urls} from './type';
export const webTitle: string = "Jiro's Portrait Site";
export const url: urls= {
urlBlog:"https://www.s-gakuenblog.com/",
urlGit:"https://github.com/POD-azlamarhyu",
urlTwitter:"https://twitter.com/Inc_capitalist",
};
export const copyright: string = "shell varng 2022";
export const topImages:topImage[] = [
{
id:0,
image:require("../../public/topimage1.png").default,
},
{
id:1,
image:require("../../public/topimage2.png").default,
},
{
id:2,
image:require("../../public/topimage3.png").default,
},
{
id:3,
image:require("../../public/topimage4.png").default,
}
];
//ここからが新しい編集部分
export const hobbysCardContents:hobbysTypes[] = [
{
id: 0,
image: require("../../public/travel.png").default,
title: "Travel -鉄道旅行-",
description: [
{
id: 0,
param:"自分の趣味の中で最も優先度が高く,お金もかかっているものです.鉄道で日本各地に赴いては,自分がその場に生きていたことをカメラで記録しています.",
},
{
id: 1,
param: "今,日本はどんどん鉄路が消えていっている状態です.少しでも,皆様に鉄道に興味を持っていただくための活動もしていきたいと考えております.",
}
],
},
{
id: 1,
image: require("../../public/gadget.png").default,
title: "Gadget -PC&ガジェット-",
description: [
{
id: 0,
param: "PCやカメラ,スマートフォンなどのガジェット類がとても好きです.パソコンはPCパーツを一つ一つ選んで組んだり,PC周辺機器でより便利で生産性を上げる品がないか日々探してます.",
},
{
id :1,
param: "PCパーツも色々調べたり,旅で使うカメラなども選んでいます.",
}
],
},
{
id: 2,
image: require("../../public/anime.png").default,
title: "Anime&Comic -アニメ&漫画-",
description: [
{
id: 0,
param: "日本の文化,アニメなどもお金が比較的かからない趣味として楽しんでいます.TVを私は捨てたので,VODサービスオンリーで視聴しています.",
},
{
id: 1,
param: "他にも,漫画,ラノベなども嗜んでおります.さらに,二次創作を某小説投稿サイトにて執筆しております.",
}
],
},
{
id: 3,
image: require("../../public/money_kabuken.png").default,
title: "Assets Management -資産運用-",
description: [
{
id: 0,
param: "今の日本の状況から打開するために,自分の資産の置き方を考えた結果,自身で資産を運用しています.",
},
{
id: 1,
param: "中でも,株式に投資し,少しでも資産を増やす努力をすることを当たり前にし続けた結果趣味となりました."
}
]
},
{
id: 4,
image: require("../../public/blogimg.png").default,
title: "発信",
description: [
{
id: 0,
param: "ブログにて, 自分の経験や知識を少しでも役立ててもらえればと思い, 発信しております. "
},
{
id: 1,
param: "発信内容はプログラミングやガジェットなどの技術系, 資産運用やクレジットカードに関する金融系の2系統で発信を行っております. "
}
]
}
];
//ここまで
export const worksCardContents:workTypes[] = [
{
id: 0,
image: require("../../public/portrait_e.png").default,
title: "Portrait Site",
description: "紹介サイト作成したいと思ったのでNextの練習も兼ねて作成しました.",
useTech: [
{
id:0,
mark: "devicon-javascript-plain colored",
},
{
id: 1,
mark:"devicon-nextjs-plain-wordmark colored",
},
{
id:2,
mark:"devicon-materialui-plain colored",
},
{
id:3,
mark:"devicon-tailwindcss-plain colored",
}
],
repository:"https://github.com/POD-azlamarhyu/portraitSite",
},
{
id: 1,
image: require("../../public/twitter_clone.png").default,
title: "Twitter Clone SPA",
description: "TwitterのクローンをDjangoRF,postgreSQL,NextJS,Dockerを用いてSPAとして作成.",
useTech: [
{
id:0,
mark: "devicon-python-plain colored",
},
{
id: 1,
mark:"devicon-django-plain-wordmark colored",
},
{
id:2,
mark:"devicon-nextjs-original-wordmark colored",
},
{
id:3,
mark:"devicon-typescript-plain colored"
},
{
id:4,
mark:"devicon-materialui-plain colored"
},
{
id:5,
mark:"devicon-tailwindcss-plain colored",
},
{
id:6,
mark:'devicon-docker-plain colored',
},
{
id:7,
mark:'devicon-postgresql-plain colored',
}
],
repository:"https://github.com/POD-azlamarhyu/Twitter_clone_SPA"
},
{
id: 1,
image: require("../../public/toweet_e.png").default,
title: "Django Tweet App",
description: "twitterのクローンをDjangoの練習も兼ねて作成しました.",
useTech: [
{
id:0,
mark: "devicon-python-plain colored",
},
{
id: 1,
mark:"devicon-django-plain-wordmark colored",
},
{
id:2,
mark:"devicon-javascript-plain colored",
},
{
id:3,
mark:"devicon-bootstrap-plain colored"
}
],
repository:"https://github.com/POD-azlamarhyu/Twitter_clone_with_Django"
},
{
id: 2,
image:'',
title: "Stock data scraiping",
description: "株のデータを収集するために作成しました.",
useTech: [
{
id:0,
mark: "devicon-python-plain colored",
},
{
id: 1,
mark:"devicon-numpy-original colored"
}
],
repository: "https://github.com/POD-azlamarhyu/getStockdata",
},
{
id: 3,
image: require("../../public/watch_e.png").default,
title: "JS Web Watch",
description: "DOMの理解のため,WEB時計を作成しました.",
useTech: [
{
id:0,
mark: "devicon-javascript-plain colored",
}
],
repository: "https://github.com/POD-azlamarhyu/Javascript_light_watch",
},
{
id: 4,
image: require("../../public/unity_e.png").default,
title: "Unity Ball Rolling Game",
description: "Unityを使った3Dコースゲームです.",
useTech: [
{
id:0,
mark: "devicon-csharp-plain colored",
},
{
id: 1,
mark:"devicon-unity-original colored"
},
],
repository: "https://github.com/POD-azlamarhyu/unity_tutorial_scrollegame",
},
{
id: 5,
image: require("../../public/portrait_e.png").default,
title: "Portrait Site TypeScript ver.",
description: "上記自己紹介サイトのTypeScript版です. ",
useTech: [
{
id:0,
mark: "devicon-typescript-plain colored",
},
{
id: 1,
mark:"devicon-nextjs-plain-wordmark colored",
},
{
id:2,
mark:"devicon-materialui-plain colored",
},
{
id:3,
mark:"devicon-tailwindcss-plain colored",
}
],
repository:"https://github.com/POD-azlamarhyu/portraitSite_ts",
},
];
const skillCardCol:skillCardCol = {
red:`bg-gradient-to-r from-fuchsia-500 to-fuchsia-200 w-full md:w-132 md:h-80 m-auto rounded-xl shadow-2xl transform hover:scale-110 transition-transform`,
blue:`bg-gradient-to-r from-blue-500 to-blue-200 md:w-132 w-full md:h-80 m-auto rounded-xl shadow-2xl transform hover:scale-110 transition-transform`,
indigo:`bg-gradient-to-r from-indigo-500 to-indigo-200 w-full md:w-132 md:h-80 m-auto rounded-xl shadow-2xl transform hover:scale-110 transition-transform`,
green:`bg-gradient-to-r from-gray-500 to-gray-200 w-full md:w-132 md:h-80 m-auto rounded-xl shadow-2xl transform hover:scale-110 transition-transform`
}
export const skillCardContents:skillTypes[] = [
{
id: 0,
image: "devicon-python-plain colored",
title: "Python 3",
stars: 4,
description: "最も触れている言語の一つです.",
color: skillCardCol.blue,
},
{
id: 1,
image: "devicon-c-plain colored",
title: "C lang",
stars: 1,
description: "ポインターでメモリ管理の勉強を行うため,使ってました.",
color: skillCardCol.blue,
},
{
id: 2,
image: "devicon-csharp-plain colored",
title: "C#",
stars: 2,
description: "主にWindows開発とUnityでのゲーム開発で使っています.FPS作りたい.",
color: skillCardCol.blue,
},
{
id: 3,
image: "devicon-javascript-plain colored",
title: "JavaScript",
stars: 4,
description: "フロントエンドの開発で主に使っています.",
color: skillCardCol.red,
},
{
id: 4,
image: "devicon-typescript-plain colored",
title: "TypeScript",
stars: 3,
description: "JSと並行して型付になれるため勉強していきます.",
color: skillCardCol.red,
},
{
id: 5,
image: "devicon-java-plain colored",
title: "Java",
stars: 2,
description: "主に研究でのAndroid開発に使っています.",
color: skillCardCol.blue,
},
{
id:6,
image: "devicon-ruby-plain colored",
title: "Ruby",
stars: 3,
description: "大学の授業のほか,サーバサイド言語の習得のため学んでいます.",
color: skillCardCol.blue,
},
{
id: 7,
image: "devicon-android-plain colored",
title: "Android",
stars: 2,
description: "研究のほか,個人開発でアプリの方面も触っています.",
color: skillCardCol.green,
},
{
id: 8,
image: "devicon-react-original colored",
title: "React JS",
stars: 4,
description: "フレームワークの中で最も触っています.",
color: skillCardCol.green
},
{
id: 9,
image: "devicon-nextjs-plain-wordmark colored",
title: "Next JS",
stars: 4,
description: "フレームワークの中で最も触っています.SSGやSSRをするためにやっています.",
color: skillCardCol.green,
},
{
id: 10,
image: "devicon-django-plain-wordmark colored",
title: "Django",
stars: 4,
description: "サーバサイドのフレームワークとして使っています.Pythonが最もなれているのでこれを選びました.",
color: skillCardCol.green,
},
{
id:11,
image: "devicon-rails-plain colored",
title: "Ruby on Rails",
stars: 1,
description: "日本はRailsが実務で使われていることが多いので勉強しています.",
color :skillCardCol.green,
},
{
id: 12,
image: "devicon-unity-original colored",
title: "Unity",
stars: 2,
description: "ゲームエンジンとして使っています.",
color: skillCardCol.green,
},
{
id:13,
image: "devicon-postgresql-plain colored",
title: "PostgreSQL",
stars: 4,
description: "データベースでOSSなので使っています.SQLは実務でかなり鍛えられました.",
color: skillCardCol.indigo,
},
{
id: 14,
image: "devicon-git-plain colored",
title: "Git",
stars: 4,
description: "ソースコード管理に使ってます.",
color: skillCardCol.indigo,
},
{
id:15,
image: "devicon-github-original colored",
title: "GitHub",
stars: 4,
description: "Gitのウェブサービスとして使ってます.",
color: skillCardCol.indigo,
},
{
id:16,
image: "devicon-tensorflow-original colored",
title: "Tensorflow",
stars: 3,
description: "機械学習で使っています.",
color: skillCardCol.blue,
},
{
id:17,
image: "devicon-tailwindcss-plain colored",
title: "Tailwind CSS",
stars: 4,
description: "フロントエンドで重宝しています.かなりの頻度で使っていますので結構覚えました.",
color: skillCardCol.red,
},
{
id:18,
image: "devicon-bulma-plain colored",
title: "Bulma",
stars: 2,
description: "フロントエンドでサブのCSSフレームワークとして使ってます.最近はあまり使ってません.",
color: skillCardCol.red,
},
{
id:19,
image: "devicon-sass-original colored",
title: "SASS (SCSS)",
stars: 2,
description: "CSSをより効率的に書くために使ってます.",
color: skillCardCol.red,
},
];
HobbysページのカードUIに表示させる内容は、こちらも配列で宣言しています。説明部分をさらに配列にして、配列のネストを形成しています。それに応じて、型宣言についても、2つ宣言を行っています。
ポートフォリオ作成 TailwindCSSの設定
最後に、今回デザインで使用しているCSSフレームワークのTailwindCSSの設定を行います。TailwindCSSは、予め決められたクラス名をそれぞれの要素に設定することで、正しく動作し、デザインを簡略化してくれます。
現在のままだと、実は規定外のクラスを用いています。
そこで、TailwindCSSはさらに自分でクラス名を設定し、CSSの要素を自分で設定することができるという、拡張性もある素晴らしいものがあります。
今回はそれを行うために設定を行います。
./app/tailwind.config.js ファイルを下記のように編集してください。
module.exports = {
  mode:'jit',
  content: [
    "./pages/**/*.{js,ts,jsx,tsx}",
    "./components/**/*.{js,ts,jsx,tsx}",
  ],
  theme: {
    extend: {
      width:{
        '76':'304px',
        '80':'320px',
        '84':'336px',
        '88':'352px',
        '100':'28rem',
        '104':'400px',
        '108':'416px',
        '112':'432px',
        '116':'448px',
        '120':'464px',
        '124':'480px',
        '128':'496px',
        '132':'512px',
        '136':'528px',
        '140':'544px',
        '144':'560px',
        '148':'576px',
        '152':'592px',
        '156':'608px',
      },
      height:{
        '76':'304px',
        '80':'320px',
        '84':'336px',
        '88':'352px',
        '100':'28rem',
        '104':'400px',
        '108':'416px',
        '112':'432px',
        '116':'448px',
        '120':'464px',
        '124':'480px',
        '128':'496px',
        '132':'512px',
        '136':'528px',
        '140':'544px',
        '144':'560px',
        '148':'576px',
        '152':'592px',
        '156':'608px',
      },
      fontSize:{
        '10xl':'152px',
        '11xl':'176px',
      }
    },
  },
  plugins: [],
}
上記はTopページを作る解説にて、環境構築の解説の章にて編集しました。
あの時点では、TailwindCSSのセットアップのデフォルト状態です。このファイルを編集することで、自分の思うようなデザインをすることが可能です。
今回は、要素の横幅、縦幅、文字等を拡張してより大きいスタイリングをできるようにしました。
ポートフォリオ作成 実行
ここまできましたら、実際に実行して確認してみましょう。
$ npm run devこれで、すべてのページを実装することができました。
あとは、これをデプロイすることでインターネット上に公開され、誰でも見れるようにすることができます。
ポートフォリオ作成 GitHubへプッシュ
では、ここまで作成しましたので、GitHubへプッシュしてみましょう。
GitHubというのは、コードをクラウドで管理・保存のほか、多人数で開発するといった際に重宝する分散型管理ツールGitのWebサービスです。
デプロイはいくつか方法はありますが、最も簡単なVercelにデプロイするのも簡単になりますのでGitHubにアップロードします。
GitHubに登録していない方は、登録してみましょう。

Githubにプッシュするには、まずリポジトリを作ってください。
GitHubのマイページのレポジトリタブの画面に向かい、そこのNewをクリック。
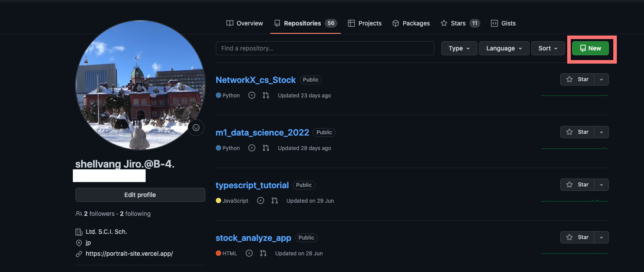
リポジトリネーム、公開リポジトリにして作成。
リポジトリを作りましたら、順番にGitコマンドを叩いていき、プッシュします。
$ git init
$ git add .
$ git commit -m "first commit"
$ git branch -M main
$ git remote add origin git@github.com:<ユーザID>/<リポジトリ名>.git
$ git push -u origin main
GitHubにプッシュする際は上記のようにして、Gitコマンドを叩いていきます。
ユーザIDとリポジトリ名は、リポジトリを作成した直後の画面に表示されますので、コピペしていただければ大丈夫です。
これで、GitHubへプッシュは完了です。
続いて、デプロイをしていきます。
デプロイについては、Vercelを使用します。
このサービスも、登録していない方は、登録をしましょう。

GitHubアカウントでログインもできます。そちらのほうが便利なので良いでしょう。
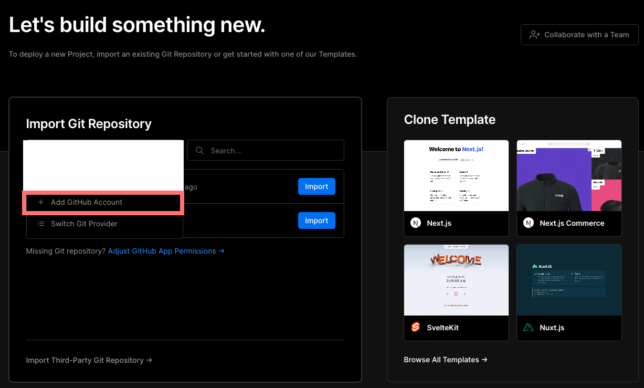
Vercelのマイページで新たにプロジェクト作成します。
この画面にて、新たに赤枠のGitHubアカウントを追加してください。
続いて、表示される画面で、今回Vercelにデプロイするリポジトリを選択してください。リポジトリを選択してデプロイボタンを押すのみで、できますのでGitHubへプッシュしたんですね。
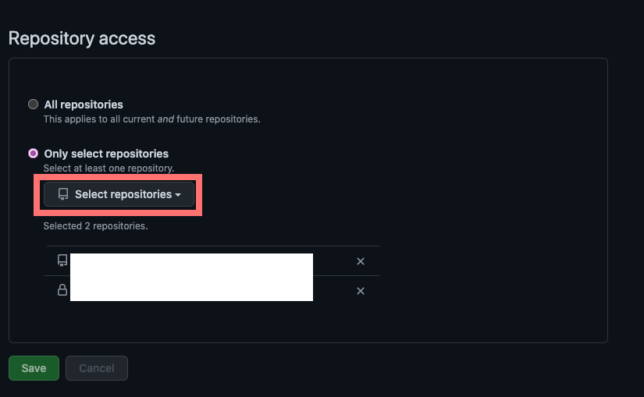
リポジトリを選択したら、緑色のSaveボタンを押して、インポートします。そこから進めていけば、デプロイ完了です。
デプロイが完了しましたら、URLにアクセスしてみてください!
まとめ
では、今回のまとめに入ります。
これにて、NextJSを使った、初学者向けのチュートリアルの解説を終わります。
今後も、ぜひ、NextJS・ReactJSを使ってみてください!